The Importance of Water Changes and How to Perform Them
Carrying out successful water changes in your aquarium is an essential aspect of effective tank maintenance and plays a crucial role in promoting the health of your plants and fish. We recognize the significance of water changes in the upkeep of planted aquariums.
Towards the end of this article, you'll find a concise 5-step guide that simplifies the process of performing a water change.
But first, we present a comprehensive overview to assist aquarium enthusiasts in comprehending the importance of water changes and mastering the art of executing the best possible water change for their unique tank requirements. Each tank is distinct, and by reading further, you'll gain a deeper understanding of what your tank necessitates in terms of water changes.
- Tip: If you are a novice, we suggest starting with a small-scale, low-tech tank until you develop a better understanding of water parameters and their impact on your aquatic inhabitants.
Percentage & How Often
One of the most common errors made by aquascapers is neglecting to perform water changes frequently enough. Many challenges faced by aquascapers, such as algae outbreaks, can be easily remedied by increasing the frequency of water changes.
So, how do you determine the frequency and percentage of water to be changed and replaced?
This can be determined by considering the bioload of your tank. The bioload refers to the amount of waste produced by the livestock in your tank. If you have a tank with a significant bioload, you may need to perform larger water changes more frequently.
The significance of removing the bioload from your tank is further explained in the Water Quality section below. It is crucial to engage in weekly maintenance of your planted tank as it helps prevent issues like algae blooms.
- For tanks with smaller livestock populations and powerful filtration systems (including nanotanks), a weekly water change of 15-20% is generally sufficient (20% for bi-weekly water changes).
- On the other hand, larger tanks with a substantial number of livestock will require more substantial water changes of around 30% to 50% on a weekly basis.
- During the initial month of setting up a new tank, it is advisable to perform water changes more frequently, ideally 2-3 times per week, until the tank has established itself.
Remember, skipping water changes can have detrimental effects on the well-being of the livestock in your tank. It is an important responsibility when maintaining a planted aquarium.
Equipment
Now that you are aware of the appropriate water change frequency and volume, it's time to gather your water change equipment.
You will need:
- A large empty bucket (approximately 5 gallons is the standard size).
- A siphon or gravel vacuum.
- Dechlorinator.
- Water test kit.
The bucket is essential for collecting the old tank water, while the siphon serves as a means to remove water from the tank. Volume markings on the bucket are helpful for calculating the percentage of water being removed. Make sure to choose a bucket with an appropriate capacity for your water change needs, while also considering its weight when fully loaded.
For the siphon, you can use a simple piece of airline hose, but using a gravel vacuum designed for aquarium cleaning and vacuuming is more convenient. When refilling your tank, it is crucial to only use water that has been dechlorinated, conditioned, or purified and is at the correct temperature. (Further details on water quality are provided below.)
If you are dealing with algae issues, we recommend using an Aquarium Plant Protector during your water change. This specialized formula contains all-natural plant extracts that act as algae-clearing agents in an aquarium. After removing the old tank water, follow the dosage instructions carefully and add the Plant Protector before adding the fresh tank water.
When reintroducing water to your aquarium, it is best to achieve a slow and steady flow to allow the water parameters to acclimate. One effective method is to elevate your bucket above the aquarium and use the gravel siphon to draw water from the bucket into the tank.
Water Quality
- Please Note: It is crucial to conduct thorough research on the specific water parameters required for the optimal health and well-being of your plants and livestock in your tank.
This includes considering both the existing water parameters of your tank and the parameters of the water you will be adding during water changes.
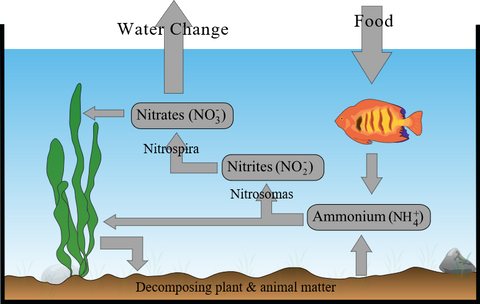
Once your tank has established a nitrogen cycle, beneficial bacteria will convert harmful toxins into less harmful substances (ie. nitrate). Still, you must remove the high levels of accumulated chemicals (like nitrate) and toxins through water changes.
Understanding the quality of the water you are adding to your tank is of utmost importance. Unless you are using pure reverse osmosis water, it is essential to familiarize yourself with the characteristics of your tap water before performing a water change.
Aquarium testing kits are valuable tools for assessing crucial water parameters of your tap water, such as pH, ammonia, nitrite, nitrate, and GH/KH. Once you have established a baseline understanding of your tap water, you can make adjustments to match the specific requirements of your aquarium.
PH refers to the acidity level of your tank water, and it is crucial to establish the correct pH balance for the thriving of your livestock. Factors like stones or other hardscape materials can influence the pH balance in your aquarium. Certain plants or fish may have specific pH preferences, so we recommend regularly testing your tank water every few days after a water change.
KH (carbonate hardness) and GH (general hardness), are closely linked to pH levels. Higher pH levels typically correspond to higher GH levels. Imbalances in these parameters can be detrimental to certain livestock, so it is important to pay special attention to them after water changes.
If you have fish in your aquarium, it is important to monitor the levels of ammonia and nitrate. Ammonia is produced from fish waste and converts to nitrite, which then further converts to nitrate. If left unbalanced, this nitrification process can be harmful to your livestock. Conducting regular water changes can help remove excess nitrates that may have accumulated. While nitrates are generally harmless, their accumulation can become problematic in a planted aquarium. By ensuring regular water changes and maintaining a sufficient number of plants, you can create a natural ecosystem that effectively balances the chemical composition of your tank.
If you observe any changes in the behavior of your fish after a water change, such as loss of appetite, it may indicate a problem with the water parameters. In addition to water changes, various factors like waste, plants, and hardscape can influence water parameters in your tank. Regularly monitoring your water parameters is essential to avoid any potential complications.
Dechlorinating Your Water
Tap water typically contains chlorine, which is added to ensure clean drinking water but can be harmful to the bacteria colony, plants, and livestock in your aquarium. To protect your aquarium inhabitants, it is crucial to dechlorinate the water before adding it to your tank.
To achieve the best results, use a dechlorinator to remove chlorine from the water. Before dechlorinating, ensure that your bucket is properly cleaned. Measure the exact amount of water you plan to add to your aquarium and pour it into the bucket that you will use for siphoning. Follow the instructions on the dechlorinator bottle to add the appropriate amount to the water.
Temperature
During a water change, it is important to monitor and manage the temperature to prevent stress or shock to your fish and dwarf shrimp species, as they can be sensitive to rapid temperature changes. Take note of the temperature in your aquarium and the temperature of the dechlorinated water you intend to add.
To minimize temperature differences, there are a couple of methods you can employ:
- Use a heater: Before adding the dechlorinated water, place a heater in the water container and adjust it to match the temperature of your aquarium. This ensures that the new water is at the same temperature as your tank.
- Room temperature adjustment: If you are not using a heater in your aquarium, allow the container of new water to sit in the same room as the tank for a few hours. This will allow the new water to naturally reach the same temperature as your aquarium.
By paying attention to temperature and properly managing the dechlorination process, you can help maintain a stable and comfortable environment for your aquatic inhabitants during water changes.
Easy 5-Step Water Change
Now that you have gathered your equipment and understand the importance of water parameters, follow these simple steps to perform your water change:
1. Prepare your new tank water. Take the necessary time (which can sometimes be up to 24 hours) to ensure that all water parameters are suitable for your tank before proceeding.
2. Prepare your tank. Turn off any equipment that may be exposed to air during the process, such as the filter, CO2 system, and heater.
3. Clean your tank. Use a glass scraper to quickly remove any algae buildup on the glass and trim or remove dead leaves from your plants. Before siphoning, use a net to remove as much floating debris as possible from the water.
4. Siphon out old tank water into your bucket and vacuum the substrate. Keep the head of the gravel vacuum close to the substrate while removing water to eliminate accumulated waste and toxins. Thoroughly vacuum the entire substrate to remove as much debris as possible, including plant waste from pruning.
Note:
- Take caution when siphoning water to avoid accidentally sucking up small fish or other critters in your tank.
- If you are using the Aquarium Plant Protector for algae problems, add the recommended dose after siphoning out the old water and before introducing the new water. Follow the instructions on the container carefully.
5. Add your prepared new tank water. Double-check the water parameters and temperature to ensure they are appropriate for your tank. Use the siphon to introduce the new water into your tank with a slow and steady flow. Once the process is complete, you can turn on your equipment again (filter, CO2 system, heater). Remember to monitor your tank's water parameters regularly in the following days.
By following these steps, you have gained the knowledge to master the art of water changes, bringing you one step closer to becoming an advanced aquascaper.